VMC Sizing Script and the VMC Sizer API
I promise, I am not going to post only about sizing, see what I did there ;)

Link to VMC Sizer Script on Github
Hello all. This is blog post number two and we are still on the subject of sizing. If you read through my previous post regarding Azure Migrate and AVS then you will see that I am very much in favour of automating processes, especially when it comes to sizing.
Now I will caveat this statement with the following. When you are sizing large DC environments, I cannot stress enough the importance of “Domain knowledge”. A friend of mine whom I worked with at Microsoft told me a little fable, which certainly rings true to anything around data and can be used in the context of sizing.
“A team of scientists discover the most perfect growing conditions for growing tomatoes in Zambia, the most perfect soil for tomatoes combined with the right amount of sunlight and water fall. The scientists traveled to Zambia and planted the tomato seeds, a few months later they returned to view what they believed would be a plentiful, delicious crop. They found nothing but eaten tomatoes. The scientists asked the local villagers, what happened. The villagers informed them, “Oh yeah, you shouldn’t grow tomatoes here…. The Zebras eat them….”
The moral of the story, domain knowledge, when it comes to “Raw Data” can play a big part in gleaming intelligence from the data 😉 Make sure you understand the workloads before migrating them, do they need to be migrated? Will moving to the cloud make that workload redundant? Can that workload be better served by a SaaS or PaaS offering in native cloud as part of the migration and transformation process? These are all questions which the data will not answer. It is important to engage with IT and App owners.
However, if you are making a first pass at looking at sizing for VMware Cloud on AWS or you have a small environment which you are looking to migrate, or if you are sizing a lot of separate vCenter environments, then you may want to consider scripting. Which you can do. Because the VMC Sizer portal, has an API.
So how do we get started here. I am going to break this down into two parts, first we will look at the VMC Sizer API and get a feel for how it works. This will help you if you are looking to create your own automation around this programming interface. Then we will go through a little PowerShell Script that I have put together to help with the process of collecting vCenter VM data and putting that information into the VMC Sizer API. I posted a link to the repository hosting that script at the top of the article, but here it is again 😉 Link to VMC Sizer Script on Github
The VMC Sizer API
First of all I am going to go through the open API for the VMC Sizer. I’ll work in Postman There will be a sample JSON file which you can use and send to the API coming below shortly 😄.
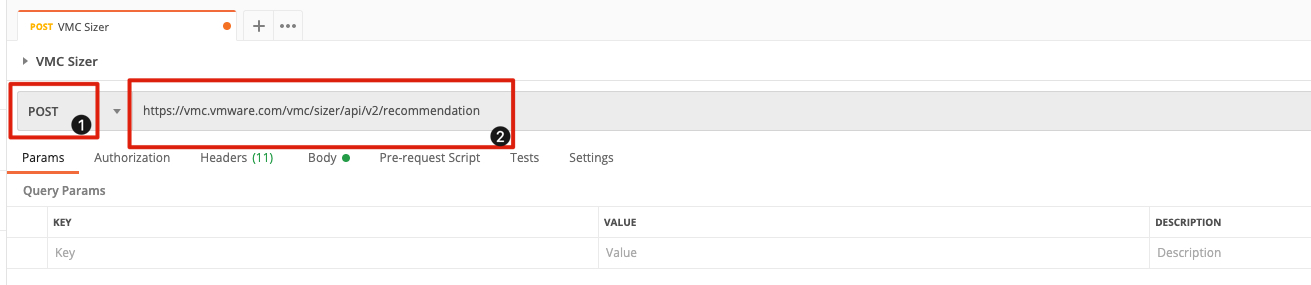
First of all lets go into Postman, I won’t tell you how to download and install and use this, there are plenty of articles out there on this topic.
Create a new request of type POST to the following address “https://vmc.vmware.com/vmc/sizer/api/v2/recommendation"
Content Type is fairly straight forward, so we will create a Content type of application/json

Now we need to give the API our Payload. You can copy the Raw JSON from there or just take the below code block
{
	"clusterConfiguration": {
		"profileModeCode": "FS",
		"instanceType": "i3en",
		"stretchedCluster": false,
		"cpuHeadroom": 15,
		"hostFailureToTolerate": 0,
		"faultToleranceMethod": "auto"
	},
	"workloads": [{
		"vmProfile": {
			"vCpusPerVM": 2,
			"vCpusPerCore": 4,
			"vRAMPerVM": {
				"value": 4,
				"units": "GB"
			},
			"vmsNum": 100,
			"vmdkSize": {
				"value": 200,
				"units": "GB"
			},
			"targetRAMRatio": 1.25,
			"dedupOrCompressionRatio": 1,
			"resourceUtilization": {
				"cpuUtilization": {
					"value": 30,
					"units": "%"
				},
				"memoryUtilization": {
					"value": 100,
					"units": "%"
				}
			},
			"iopsPerVM": 50,
			"ioProfile": {
				"ioAccessPattern": "Random",
				"blockSizeInKB": 4,
				"ioRatios": "70/30"
			}
		},
		"workloadCategory": "GPW",
		"workloadType": "GVM",
		"workloadName": "Workload Profile"
  }]
}
As you can see it’s a pretty straight forward payload example. the only things to keep in mind are the following;
If you are looking to size for the i3.metal node type then you will need to specify the following in the clusterConfiguration
{
	"clusterConfiguration": {
		"profileModeCode": "FDS",
    "instanceType": "i3",
Just to clarify the instanceType changes, as does the profileModeCode to “FDS”
All the other options can be adjusted and tweaked, the options are pretty clear and fall in line with the options which you would choose if you were to go through the process manually within the VMC Sizer UI.
In Postman, Click on Send and you should, if all is well and your JSON body payload is formatted correctly, see a response body. There is a good amount of verbose information, but the main cluster configuration recommendation will look something like this;
"clusterConfiguration": {
            "sddcInformation": {
                "nodesSize": 5,
                "rawStorage": {
                    "value": 22.73,
                    "units": "TB"
                },
                "usedStorage": null,
                "rawFreeStorage": {
                    "value": 29.11,
                    "units": "TB"
                },
                "freeStorage": {
                    "value": 21.89,
                    "units": "TB"
                },
                "usableStorage": {
                    "value": 11.89,
                    "units": "TB"
                },
                "provisionedStorage": {
                    "value": 51.84,
                    "units": "TB"
                },
                "instanceType": "i3",
                "minNumberOfClusters": 1,
                "ftt": "1",
                "ftm": "RAID-5",
                "sddcType": "regular"
            }
        },
        "diskSpaceUsageOverheads": {
            "checksumOverhead": {
                "value": 0.0212,
                "units": "TB"
            },
            "dedupOverhead": {
                "value": 0.0,
                "units": "TB"
            },
            "diskFormatOverhead": {
                "value": 0.1781,
                "units": "TB"
            },
            "rawStorage": {
                "value": 17.8114,
                "units": "TB"
            },
            "slackSpace": {
                "value": 4.2282,
                "units": "TB"
            },
            "swapSpace": {
                "value": 0.0,
                "units": "TB"
            },
            "physicalReservation": {
                "value": 0.5284,
                "units": "TB"
            },
            "logicalReservation": {
                "value": 0.1708,
                "units": "TB"
            },
            "freeStorage": {
                "value": 21.89,
                "units": "TB"
            },
            "rawFreeStorage": {
                "value": 21.89,
                "units": "TB"
            }
        },
        "instanceType": "i3",
        "recommendationType": "Memory bound",
        "serverConfiguration": {
            "cores": {
                "value": 180.0
            },
            "memory": {
                "value": 2.5,
                "units": "TB"
            },
            "provisionedStorage": {
                "value": 51.84,
                "units": "TB"
            },
            "rawCache": {
                "value": 17.28,
                "units": "TB"
            },
            "rawStorage": {
                "value": 22.73,
                "units": "TB"
            },
            "freeStorage": {
                "value": 21.89,
                "units": "TB"
            },
            "rawFreeStorage": null,
            "rawStorageNoOverheads": {
                "value": 15.82,
                "units": "TB"
            },
            "usableStorage": {
                "value": 11.89,
                "units": "TB"
            }
        },
        "sizingAssumptions": [
            "Assumes Drive Size of 1.728 TB",
            "Number of Disk Groups per Node = 2",
            "Number of Cache Drives per Node = 2",
            "Number of Capacity Drives per Node = 6",
            "CPU Clock speed of 2.3 GHz",
            "Maximum number of Nodes per cluster is set to 16",
            "Per SDDC a total of 34 vCPUs, 240 GB of memory and 1676 GB of storage is considered to be the overhead consumed by Management Virtual Machines",
            "Admission control requires an additional host per cluster when the recommendation is CPU or memory bound"
        ],
        "workloadProfilesSummary": [
            {
                "vmsSize": 210,
                "workloadName": "Workload Profile"
            }
        ],
        "success": true,
        "message": null
    }
As you can see, my sample data has suggested an I3 Node count of 5, based on the inputs which I sent to the API
So now that we know how to play with the API for the VMC Sizer. Lets take a look at how we can potentially use this in PowerShell to collect all the inputs and send that information to the VMC Sizer API.
VMC Sizer PowerShell Script
In the VMC Sizer there is some really useful functionality, which at the time of writing this blog post, had only recently been released. This functionality allows you to upload either an RVTools or Liveoptics exported .xlsx file to the VMC Sizer to size an environment based on the data collected and presented in either of those tools.
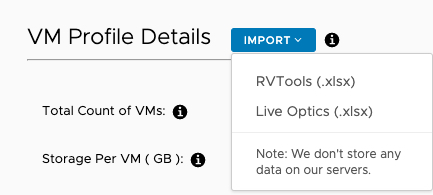
This is great. It’s certainly much needed functionality and removes potential for human error when correlating data via pivot tables in Microsoft Excel as part of the sizing process. But we could take this one step further with the use of a bit of PowerShell, PowerCli and the VMC Sizer API. We can automate the collection of the VM estate data from a vCenter Server, perform some simple math, update our JSON template and ask the API to size the VMware Cloud on AWS environment for us.
So with this in mind, I created a little bit of PowerShell to do this. There are plenty of examples out there of using PowerCli to collect VM metrics, and Stackoverflow was my friend in this part of the script writing process, and I was able to copy/paste of a good amount of stuff that others have used in the past to collect the sizing information (no need to reinvent the wheel here). The PowerCLI code here will collect all the VMDK files (As VMs can obviously have more than a single VMDK disk, we will want to collect all of these separate from VMs).
The script will then go and collect all the VMs (I’m thinking I might add some functionality around filtering for Powered Off VMs) and then it will calculate the amount of VMs, average vCPU/VM and Memory/VM. It will then take all this information along with the Storage information, workload considerations and then send this information to the Sizer.
At the moment the script will only size General Purpose VMs. I’ll look to add in additional workload types soon. But if people want to help out with that then please feel free to reach out 😄
I hope people find this useful, please reach out to me if you have any questions.
Please check out the Repo Readme.md file for more details.